October 29, 2009

The Magic of the mouse

Today I wanna talk about the Apple "Magic Mouse" that has been presented few days ago.
This is a little pearl of HID. Finally Apple removed that small ball from its mouse.
Personally I find that that little ball is quite unusable and easy to breaks.
This new one mouse is amazingly well designed and it recognize gestures, in fact the surface is touch sensitive and is a unique button like the track pad present in Macbook Pro laptops.
Complete specifications can be found at Apple website.
All its functions can be customized into the Settings panel, but options are a bit limited; for example you can not control functions like Exposè or functionality for rotation. To achieve those functions you need to touch the Mac keyboard again. Another point is that this mouse under Windows is recognized like a 2 button mouse and nothing else.
I think that in future Apple will update these feature through software updates. Should be useful also if its functionality will become accessible to software developers so that gesture can be used into developed applications.

Thanks for reading :-)

October 26, 2009

Check the obvious

Today each of us use to put in Stand-by almost all the devices commonly used at home.
This mechanism doesn't mean that the corresponding device doesn't consume power; the device will consume anyway lower energy, but will do.

Make an experiment: turn off all the devices that normally should stay turned on (like the fridge) and leave in Stand-by all the others (Hi-Fi, TV, DVD Player...).
Now go to your electricity counter and measure the time interval (in seconds) between two flashes of the red led. The electricity counter measure utilized electricity in Kwh. Divide 3600 per time you measured before; this result is the Kw that your devices use for Stand-by. You will be surprised that this number will not be so small as you believed.

To reduce drastically the electricity consumption you should use sockets with a switch that will interrupt the electric circuit between the device plugged into the socket and the electric network. The consumption of that device will be null.


Thanks for reading :-)

October 22, 2009

Unique Charger or Witricity?

Today attracted my attention the news on the definition of unique charger for all electronic devices: UCS (Universal Charging Solution).
Starting from 2010 all devices should adopt this UCS system that will be based on mini USB connector to facilitate users' life and reduce electronic trash. I think that this is a good think but not the final step :-)

Personally I think that is more interesting and useful the concept of charging devices without the use of any charger at all. Witricity is the solution for that.
Studies on wirelessly power electronic devices has been around from a while; Nikola Tesla made experiments since from late nineteenth century by transferring energy from a source to an incandescent light bulbs.
For example systems that charge wirelessly power devices could be distributed around in the world or in your house or car. When you are near one of these, your mobile phone will be recharged automatically.

Lets see in the near future what will be. For now PowerMat is going to sell a wireless charger at low price, some information can be found here: http://www.powermateu.com/pm_uk/home/

Thanks for reading ;-)

October 21, 2009

Macbook HDD replacement

This post will give to you a quick guide on how to replace your Macbook HDD.
Remember that I'm NOT responsible for any damage on your computer.
It just worked for me.

Step 1: Make a backup
Before starting removing your HDD make a backup of all your data. For users that have Leopard installed, just turn on Time Machine (if you haven't done yet before).
On my opinion this is the best backup software freely available on your computer.
Obviously the backup should be done into an external HDD (like a USB Hard drive) or using Time Capsule.

Step 2: Turn off the computer and remove the HDD
Shutdown your computer and unplug all connectors.
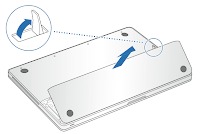
Turn over your MacBook and remove the battery by opening the panel that cover it:


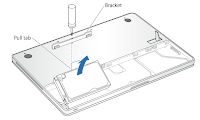
Then remove the HDD by using a Philips #0 screwdriver


Disconnect the old HDD and connect the new one.

IMPORTANT: there are 4 mounting screws on the sides of the old HDD that allows it to be taken safely into the HDD socket. remove the ones from your old drive and mount them on the replacement drive before you install it.

Now mount the new HDD in the Hard disk location, fix it with the screw and put the battery in its previous location.
Close the cover panel.

Step 3: Recovering the previous system backup on the new HDD
Before continuing, keep with you the installation DVD.
Connect the power cable, the external HDD that contains the Time Machine backup and if everything has been done with care you can turn on the Macbook power :-)
Insert immediately the installation DVD and take pressed the C key until the installation procedure starts from the DVD.
If you are not quick don't worry, just turn off the Macbook and restart it by taking the C key pressed again to allow the system to start from the DVD.

When the Mac OS Installation program shows you the first screen-shot, go into the Utilities menu and choose Dist Utility to create a partition on the new HDD. Call it Macintosh HD.
Then quit the Disk Utility.

Go again into the Utilities menu and now choose the Restore System from Backup.
This option allows you to choose the Time Machine backup from the external HDD and as destination disk choose obviously the new HDD named Macintosh HD.
Start the process and depending on the amount of the backup you have it can take a wile. In my case it took almost 1 hour.

After that the backup is restored, system will restart and you'll be in the same situation in which you turned off the Macbook before starting this process, with all the applications installed and everything running :-)

Bye for now and thanks for reading.

October 17, 2009

Hello World!!

This is my first post!
I hope that it will be an exciting and interesting adventure :-)